i. Through activity, folding a square sheet of paper construct angles of  45o, 90o.
ii. Let’s draw a parallelogram, cutting the paper and folding the angles let’s see how the diagonals intersect with each other.
iii. Folding the paper, let’s verify the properties of diagonals, square, rectangle and rhombus.
iv. Let’s construct a rhombus by 4 ![]() setsquares.
setsquares.
v. Let’s draw 45o, 90o the angles of 30o, 45o, 60o, 90o, 105o and 120o using set square.
(i). This is a simple activity, which can be done through some facts and handy items.
Materials Required: Paper, Scissors, Scale, Pencil
Process: Let us take a piece of paper and scissors. Cut this piece of paper into a square using scale and scissors.
Now, we have a square sheet of paper.
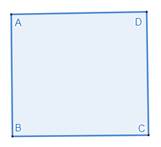
We can also mark the vertices for identification of angles.
A fact: We know that, the angles of a square are right angles.
That is, ∠ABC = ∠BCD = ∠CDA = ∠DAB = 90°
So, it is easy to construct a 90°.
Since, we know that each angle of a square is a right angle, so we can say that
∠ABC = 90°
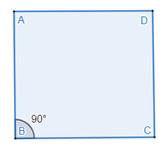
Hence, we have constructed a 90° angle.
Now, let us try to construct 45°.
Mathematically,
![]()
⇒ Half of 90° = 45°
So, just like we did mathematically we need to do practically, that is, fold the paper into halves from the vertex of ∠ABC.
Then, unfold it to get 45° angle.
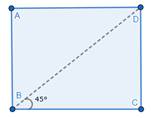
Hence, we have constructed a 45° angle.
Now, let us construct ![]() .
.
![]()
![]()
By looking at the right side, we can say that we need to half the angle 45°.
Practically,
We need to fold the paper by BD. We get 45°.
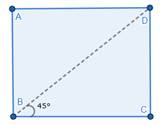
Then, fold the paper again by the same vertex.
We get half of 45°.
Then, unfold the paper.
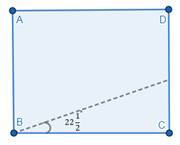
The angle obtained is the required angle.
Hence, we have constructed ![]() angle.
angle.
(ii). For this activity,
Materials required: a sheet of paper, scale, scissors, pencil and protractor
Theory:
Let us understand what a parallelogram is.
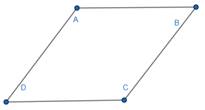
A parallelogram is a simple quadrilateral with two pairs of parallel sides. The opposite or facing sides of a parallelogram are of equal length and the opposite angles of a parallelogram are of equal measure.
Process:
Let us draw a parallelogram on a sheet of paper first and cut it along the edges.
Name it ABCD.
Here, AD ∥ BC & AB ∥ DC.
Also, AD = BC & AB = DC.
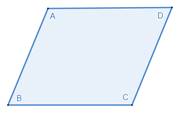
Here, the angles are ∠ABC, ∠BCD, ∠CDA and ∠DAB.
Let us draw the angles.

Now, along BD fold the paper such that there appears a visible crease.
And then unfold it.

Similarly, along AC fold the paper such that there appears a visible crease.
And then unfold it.
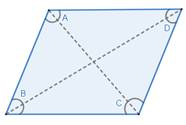
We have got the intersection of the four angles.
We need to analyze this intersection. Let this angle be O.
Using a protractor, measure the angles ∠AOB, ∠BOC, ∠COD and ∠DOA.
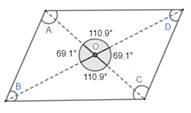
Thus, the angles formed by the intersecting diagonals AC and BD are not right-angles.
Thus, the diagonals are bisecting the other diagonal.
Hence, we have analyzed that the diagonals when intersected bisect each other.
(iii). For this activity,
Materials Required: sheet of paper, pencil, scale, scissors and protractor.
We need to verify the properties of diagonals of square.
Process:
Let us understand what square is.
The square is a geometric shape that belongs to the quadrilateral family because it has 4 sides. The 4 sides are the same length and are parallel to each other.
Properties of diagonals of square:
(a). The two diagonals are of equal length.
(b). Each diagonal bisects the other.
A diagonal is a line segment joining two vertices of a polygon or polyhedron, when those vertices are not on the same edge.
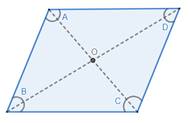
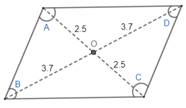
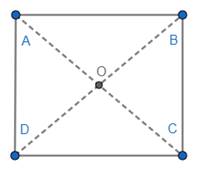
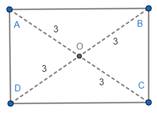
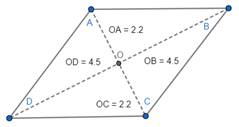
With the help of scale and pencil, draw diagonals connecting AC and BD.
Name the intersection point of AC and BD as O.
Let us verify:
(a). Let us measure the length of the diagonals AC and BD.
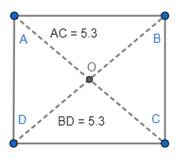
Thus, the diagonals of square are of equal length.
(b). Measure the length OA, OB, OC and OD.
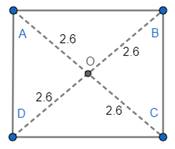
Thus, the diagonal bisects the other diagonal.
We need to verify the properties of diagonals of rectangle.
Process:
Let us understand what rectangle is.
A rectangle is a quadrilateral with four right angles. It can also be defined as an equiangular quadrilateral, since equiangular means that all of its angles are equal. It can also be defined as a parallelogram containing a right angle.
Properties of diagonals of rectangle:
(a). The two diagonals are of equal length.
(b). Each diagonal bisects the other.
(c). Opposite central angles are equal.
A diagonal is a line segment joining two vertices of a polygon or polyhedron, when those vertices are not on the same edge.
With the help of scale and pencil, draw diagonals connecting AC and BD.
Name the intersection point of AC and BD as O.

Let us verify:
(a). Let us measure the length of the diagonals AC and BD.
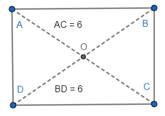
Thus, the diagonals of a rectangle are of equal length.
(b). Measure OA, OB, OC and OD.
Thus, the diagonal bisects the other diagonal.
(c). Measure the central angles, that is, ∠AOB, ∠BOC, ∠COD and ∠DOA.
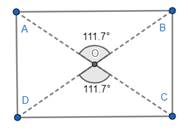
⇒ ∠AOB = ∠COD
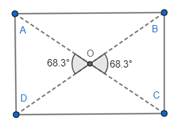
⇒ ∠BOC = ∠DOA
Thus, opposite central angles are equal.
We need to verify the properties of diagonals of rhombus.
Process:
Let us understand what rhombus is.
A rhombus is a simple quadrilateral whose four sides all have the same length. Another name is equilateral quadrilateral, since equilateral means that all of its sides are equal in length.
Properties of diagonals of rhombus:
(a). The two diagonals bisect each other.
(b). The angle at which the diagonals cross is always 90°.
A diagonal is a line segment joining two vertices of a polygon or polyhedron, when those vertices are not on the same edge.
With the help of scale and pencil, draw diagonals connecting AC and BD.
Name the intersection point of AC and BD as O.

Let us verify:
(a). Let us measure the length of OA, OB, OC and OD.
Thus, the diagonals of a rhombus bisect each other.
(b). Now, measure angles ∠AOB, ∠BOC, ∠COD and ∠DOA.
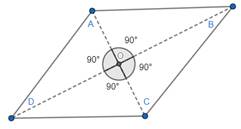
Thus, the angles at which diagonals cross is 90°.
(iv). We need to construct a rhombus by 4 set squares.
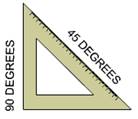
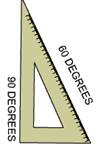
First, let us understand what a set square is.
A set square or triangle is an object used in engineering and technical drawing, with the aim of providing a straightedge at a right angle or other particular planar angle to a baseline. The simplest form of set square is a triangular piece of transparent plastic with the centre removed.
And we know what a rhombus is.
A rhombus is a simple quadrilateral whose four sides all have the same length. Another name is equilateral quadrilateral, since equilateral means that all of its sides are equal in length.
Materials required: A sheet of paper, pencil, set squares, protractor and ruler
Process:
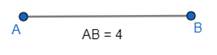
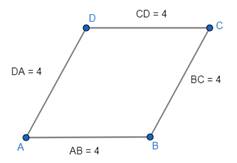
(a). Draw a line of length 4 cm using a ruler.
(b). Using a protractor, take any angle (say, 70°), draw a line AD with ∠BAD = 70°.
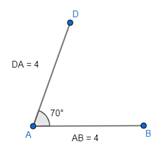
(c). Using a ruler and a set square, draw a free line. Using ruler and set square, we can ensure to draw a line parallel to AD. Measure BC = 4 cm using a ruler.
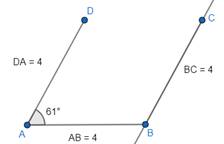
(d). Now, just join CD.
We can also measure CD, which should come out to be 4 cm.
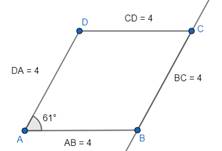
Hence, we have got the rhombus using set protractor.
(v). We need to draw angles 30°, 45°, 60°, 90°, 105° and 120° using set square.
We know that,
A set square or triangle is an object used in engineering and technical drawing, with the aim of providing a straight edge at a right angle or other particular planar angle to a baseline. The simplest form of set square is a triangular piece of transparent plastic with the centre removed.
Basically,
Set squares are used in conjunction with T-squares to draw accurate angles. There are two main types of set square. One has an angle of 45 degrees and the other 30/60 degree angles.
Materials Required: A sheet of paper, set protractor, ruler and pencil.
Note: Set squares are only accurate if they are used along with a T-square. The set square must rest on the T-square which should be pushed against the edge of the board.
Steps of construction of 30°:
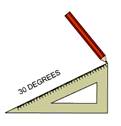
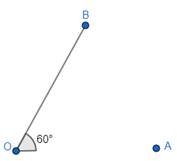
1. We need to construct an angle of 30°. Let ∠AOB = 30°.
2. To draw an angle of 30°, place the set square with the 30° angle, and then draw a ray OB starting from the vertex measuring 30°.

3. Now, join OA for the other edge, so that we get ∠AOB = 30°.
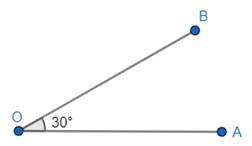
Thus, we have got the angle 30°.
Steps of construction of 45°:
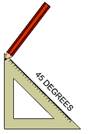
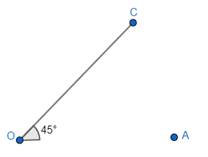
1. We need to construct an angle of 45°. Let ∠AOB = 45°.
2. To draw an angle of 45°, place the set square with the 45° angle, and then draw a ray OB starting from the vertex measuring 45°.
3. Join OA for the other edge, so that we get ∠AOB = 45°.
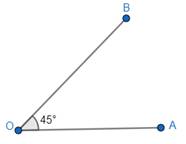
Thus, we have got the angle 45°.
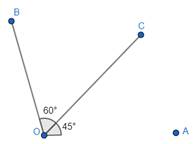
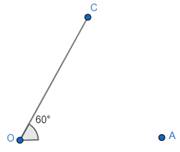
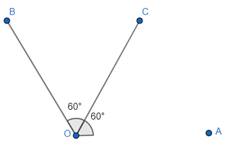
Steps of construction of 60°:
To construct an angle of 60°, use Set Square of 30° that we used earlier.
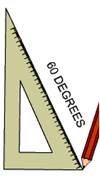
1. In order to draw 60°, place the set square with 60° angle, and then draw a ray OB starting from the vertex measuring 60°.
2. Join OA to form the other edge of the angle, so that we get ∠AOB = 60°.
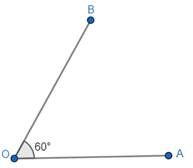
Thus, we have got the angle 60°.
Steps of construction of 90°:
Both the set squares have 90°, so either of them can be used to construct an angle of 90°.
1. Place the 30/60 degree set square or 45 degree set square at 90 degree, and draw a ray OB starting from the vertex measuring 90°.

2. Join line OA for the other edge, so that we can get ∠AOB = 90°.

Thus, we have got the angle 90°.
Steps of construction of 105°:
In order to construct an angle of 105°, we need to use both the set squares (30/60 degree and 45 degree), because
60° + 45° = 105°
1. Place the 45 degree set square at 45°, and then draw a ray OC starting from the vertex measuring 45°.
2. But as we want 105° angle, so place the 60 degree set square just adjacent to 45 degree set square such that its vertex coincides with O, draw a ray OB starting from O vertex.
3. We can rub out OC and join OA. We get ∠AOB = 105°.
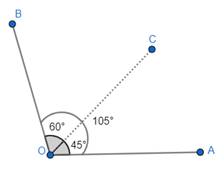
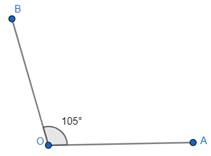
Thus, we have got the angle 105°.
Steps of construction of 120°:
In order to construct an angle of 120°, we need to use two 60 degree set squares, because
60° + 60° = 120°
1. Place the 60 degree set square at 60°, and then draw a ray OC starting from the vertex measuring 60°.
2. But as we want a 120° angle, so place the 60 degree set square again just adjacent to the 60 degree set square just used such that its vertex coincides with O, draw a ray OB starting from O vertex.
3. We can rub out OC and join OA. We get ∠AOB = 120°.
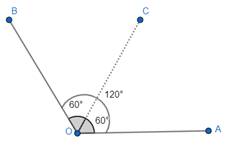
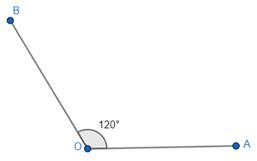
Thus, we have got the angle 120°.